Exhibitor Badges & Registration
Below you’ll find everything you need to manage your team’s registration, invite guests, purchase badges, purchase lead retrieval licenses, and prepare for onsite badge collection.
Frequently Asked Questions
Your exhibitor registration portal is accessed through a secure login system. Here’s how it works:
1. Receive Your Login Email
The assigned admin will receive an email from [email protected] (Visit Connect platform). This email includes your unique login link.
Please check your inbox and junk folder. If the email is missing, ask your IT team to whitelist (Approve) the no-reply address and check for internal delays.
If you haven’t received your login email, please contact [email protected].
2. Click the Secure Login Link
Click the link in the email to open your Exhibitor Registration Portal.
We recommend saving this link, as you will use it again for future access.
3. Enter Your Verification Code
- For security, the system uses two-step verification.
- A verification code will be sent to your registered email address.
- Enter this code in the portal to complete your login.
4. Access Your Portal Dashboard
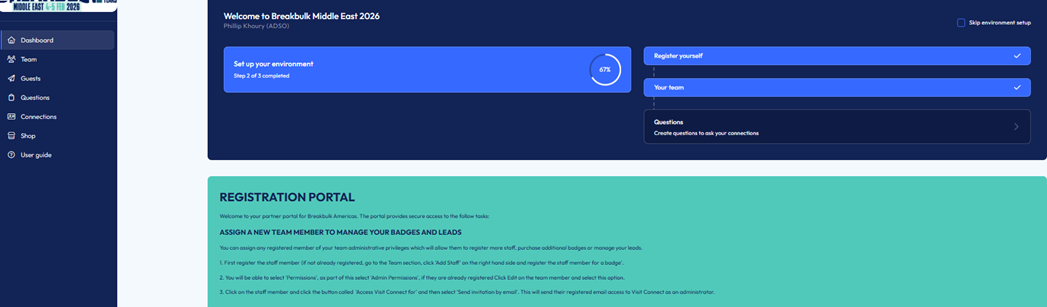
Once logged in, you can manage everything related to your participation.
The primary contact listed for your company is automatically assigned Admin Access. Admins can:
✔ Register stand staff
✔ Purchase additional badges
✔ Manage Visit Connect lead-scanning permissions
Only one admin can be assigned at a time.
If you need to change the admin, please send us the person’s: name, job title, phone number, and email address, and we will update it for you.
Grant admin privileges to any registered team member to:
-
Register additional staff
-
Purchase extra badges
-
Manage leads
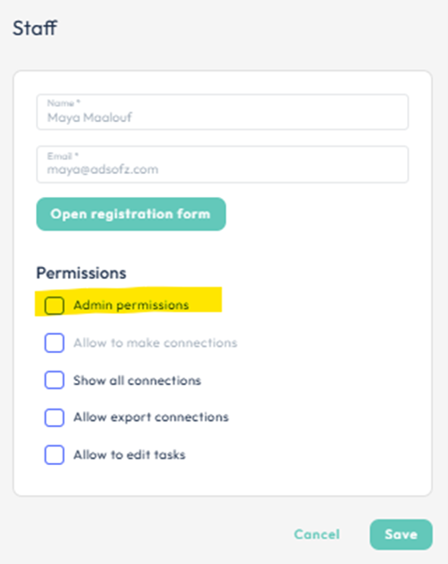
How to Assign Admin Permissions:
If the member is already registered, click Edit on their profile, Select Permissions → Admin Permissions
-
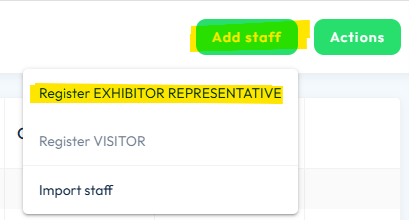
Open the Team tab
-
Click Add Staff to register each exhibitor badge individually
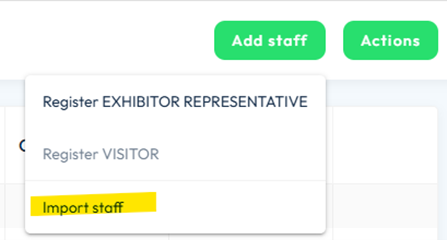
1. Go to Team → Add Staff → Import Staff
2. Go to the Download tab and get the Staff import Excel template.
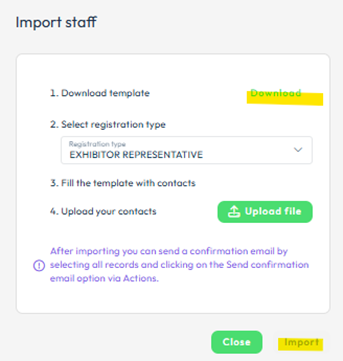
3. On the “Staff” tab, complete all mandatory fields:
First name
Last name
Company email
Company (Brand)
Job title
Country
Role
Important:
Use unique business email addresses
Ensure you have sufficient allocated badges
Do not delete/rename any columns or tabs
Save and close the file before uploading
Do not fill in “Last Name Prefix” — it may create duplicated surnames on badges.
How to Upload the File:
Go to Team → Add Staff → Import Staff
Upload the completed staff Excel template (saved on your desktop).
Click Import.
Note: a confirmation email will not be automatically sent to bulk-imported staff, however we will send out QR codes to collect badges closer to the event.
Admins can bulk-download all QR codes later
Your allocated quantity appears at the top of the Team page.
To purchase more:
Go to Team → Actions → Order more badges
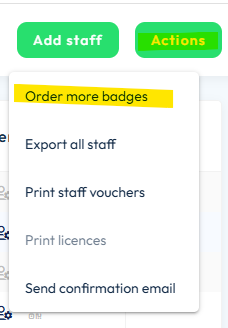
Choose:
Exhibitor Representative (discounted rate), or
Register Visitor (discounted rate)

Additional Badge Notes
Payment is by credit card only
Extra exhibitor badges are offered at a fixed discounted rate
No purchase deadline
Register all allocated badges before purchasing more
Phone numbers must begin with + followed by the country code (no spaces or dashes).
There are two ways to use guest tickets:
1. Purchased Guest Tickets (manual registration)
Purchase Discounted Guest Tickets for your extended client network. These tickets must be purchased first before you can offer them to clients.
2. Guest Discount Link (self-registration)
Send out a unique guest link for your contacts to register themselves at the discounted rate.
Purchased Guest Tickets (manual registration)
-
To purchase discounted guest tickets, Click Team → Actions → Order more badges
-
Once purchased, register guests via: Team → Add Staff → Register Visitor
-
After you enter the guest’s details, they will automatically receive an invitation email and, once they complete their form, an instant confirmation. No further action is required from you.
-
Do NOT use visitor tickets for staff — visitors do not have exhibitor access hours.
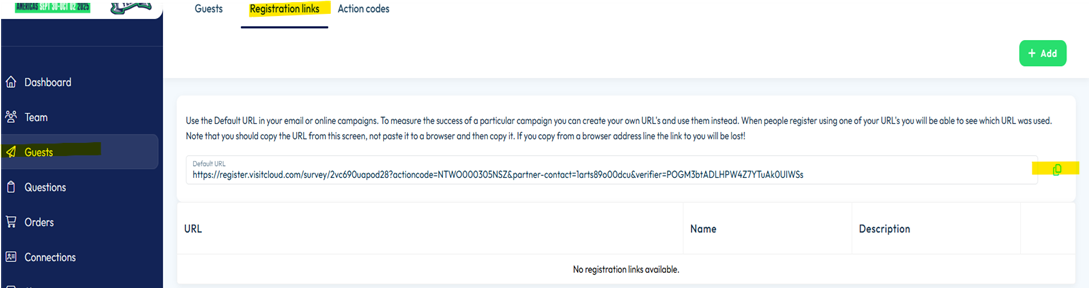
Guest Discount Link (self-registration)
-
Use your company unique guest link to invite visitors and promote your attendance.
-
Go to Guests → Registration Links → Default URL
-
Copy and share this unique URL link with your guests to receive a discount off the current visitor ticket price
-
Guests must use this link to register and pay to receive the discount (up to 25% off the current ticket price)
-
All guests who register through your link will appear in your guest list for easy follow-up.
-
Do NOT use visitor tickets for staff — visitors do not have exhibitor access hours.
Paid co-exhibitors receive 2 exhibitor passes as part of their package. All other co-exhibitor badges will be deducted from the main exhibitor’s allocation. Every co-exhibitor:
-
Receives their own registration login link
-
Can register their own stand staff
-
Gets a company profile on the event website
-
Appears individually in the Breakbulk App
-
Can request and receive meetings independently
Exhibitor Admin Can Book for Their Team
How to Book Networking or Workshops:
-
Go to Team and double-click the selected team member’s name.
-
Click Open Registration Form.
-
Click Next through the tabs (Ticket Status → Edit Profile → Profile Picture) until you reach the Book Networking or Workshop page.
-
From there, select the desired workshops or networking events and add them to your basket.
To download a spreadsheet of all registered staff:
-
Go to Team → Actions → Export all staff
-
You may also email this list to your team members.
Cancel a Badge (but keep the allocation) only valid for exhibitor badges
-
Team → select staff member you wish to cancel
-
Double click on their name→ Open registration form
-
Select Cancel this ticket
Cancellation frees up the badge but does not reduce your allocation.
Badge collection & policies
-
A separate email containing your QR codes will be sent shortly before the event dates.
-
No printing needed. Simply bring the digital QR code and you can scan it onsite (also retrievable through the Breakbulk App).
-
Admins may bulk-download all QR codes of their staff under: Team → Actions → Print Staff Vouchers
On-site printing is available at:
-
Scanning stations
-
Registration desk
-
Prepaid Visitor Badges: Non-transferable and non-refundable. All sales are final. (see website T&Cs)
-
Exhibitor Badges: For stand staff only. Exhibitor badges may be transferred only if they have NOT been printed or used onsite.
-
Contractors & Builders: No badges needed; wristbands issued onsite with stand details. (except Breakbulk Middle East – digital contractor and vehicle pass required online in advance)
-
Host Registration: Hosts hired externally must be registered.
-
Venue-Hired Hosts: Will receive temporary stand staff badges from the organiser office.
The license allows your team to scan visitor badges using a mobile phone or any web-connected device.
Visit Connect enables you to capture leads on your smart device and access them in real-time for immediate follow up. You can also:
-
set bespoke questions (via a web portal)
-
make free text notes
-
record voice memos
-
take pictures
You can order as many additional Lead Capture Licences as you require for your stand. Lead Capture Licences will share your bespoke questions created and all leads collected across your devices are collated centrally in Visit Connect.
How to Purchase:
Once your team is registered, go to the Shop in your registration portal to purchase the licence.
After purchase, you will automatically receive:
-
Visit Connect – Access Code
-
Visit Connect – Order Confirmation (includes your scanner launch link)
Follow the instructions carefully to open the link on the mobile device you will use to collect leads.
Support:
For lead retrieval assistance, contact Visit by GES: [email protected]


_1.jpg?ext=.jpg)